Link to this Frock by Friday with this button!
If you are not doing the Modcloth version then all you have to do is skip to step 8.
If you are not doing the Modcloth version then all you have to do is skip to step 8.
First problem I solved by buying wide elastic to put behind my lace.
Second problem solved by dying my elastic lace and wide elastic. See my tutorial on dying.
2. Next, if you don't have elastic lace then you must sew the wide elastic onto your lace. To do this, pull your elastic taut as you sew it to your lace.
If you have elastic lace and are using a wide elastic backing then just sew the lace to the elastic but while you are sewing you must pull the elastics taught so the thread doesn't snap when it expands. To do this hold the back of the elastics and the front as you feed it through the machine.
3. Next attach your bodice to the top of your elastic. Instead of having to sew right sides together you can simply sew the elastic on top of the bodice and skirt pieces, right side of bodice and wrong side of elastic together.
4. Pin your elastic to your bodice at each end and in the middle. Then keep pinning the elastic in between those pins so that it is evenly spaced on the bodice.
5. To sew the elastic to the bodice hold it the same way you did in step 2 so that you are pulling the elastic taut as it is fed through the machine.
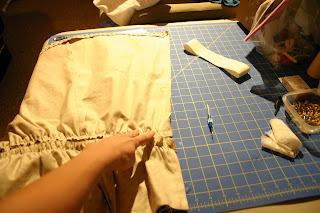
6. It should look like this.
7. Do steps 3 through 6 for the skirt piece.
8. Sew up the back. From the back bodice to the hem.
If you are not using elastic then sew in the zipper. Here's my tutorial on how to sew in an invisible zipper.


 Like not spending money?
7 {comments}:
It's starting to look like a dress! Just a word of warning to everyone, though: if you forget to pull the elastic taut, it won't act like elastic later (i.e., it will only be as stretchy as the lace). I learned that the hard way, so my dress has a zipper now. :)
You are so clever and innovative! I cannot wait to see this finished frock!
I love the way this is turning out! Thank you for the instructions! Just curious about what is facing up when you sew the elastic/lace to the skirt and bodice...do you have the fabric facing down with the lace underneath or is the fabric facing up with the lace on top so you can see where you are stitching on the lace? I did it the second way and it was a little cumbersome and my seam allowance was inconsistent.
I did it with the fabric facing up with the lace on top so you can see where you are stitching on the lace.
However, I used a very similar thread to the lace so it is not very noticeable.
It doesn't really matter which way you have it up when you're sewing. So if you have better results doing it another way, just do it which ever way works best for you.
Hope that helps!
I am just now getting around to making this dress. Am I missing the instructions for measuring and cutting the elastic to fit my waist? As well as the lace to cover the elastic? Thanks for answering such a late question.
also: the skirt and bodice seems to gather naturally. how did you gather it and sew the elastic on in one step?!
Melissa,
Just cut the elastic to the size of your waist plus allowance (ie room for sewing together, probably about 3/8" on each end). Do not pull tight around your waist as this will be uncomfortable.
As for the lace, do you have stretchy lace or regular lace? If you have regular lace then don't cut it. Just sew it to the elastic. Pull your elastic taut as you sew it to your lace. When you get to the end of your elastic then cut the lace.
As for the gathering, I did it in one step. I pinned the elastic with the lace sewed onto it to the bodice at each end and in the middle. Then kept pinning the elastic in between those pins so that it is evenly spaced on the bodice.
To sew the elastic to the bodice hold it the same way you did in step 2 so that you are pulling the elastic taut as it is fed through the machine.
Hope that helps! If you have any more questions feel free to ask!
Post a Comment