I realize that anything that deals with electricity will scare some people off. I get it. You immediately imagine burning down your house in the middle of the night! But some electrical projects are easier than others and replacing a light socket SHOULDN'T be one of those scary projects. It's actually a great way to learn some wiring basics.
I know someone out there has been confronted with having to replace a pair of lamps. It wouldn't be so bad but when one lamp breaks you end up having to buy two so that they match and that can get kind of expensive. I bought these glass gourd lamps at Lowes a few years ago. They were $30 a piece plus the shades for $15 a piece. So after taxes I had invested about $100 in them! When one of them started flickering I found myself thinking about replacing them. I took a trip to Home Goods and while I found a TON of gorgeous lamps ultimately I couldn't bring myself to spend another $100 on lamps on top of all the other expenses we've had lately. I decided to dig out my DIY belt and fix the one myself! If you don't want to spend another $100 on lamps either take a look at my easy tutorial! Only $6 total spent!
First buy a Turn Knob Socket at your hardware store. This one was only $6. That's all you're going to end up spending on this whole project!! That's a lot better than $100, right?!
Take it apart. Like so.
Now go back to your broken lamp. Unscrew the old socket from the lamp or pull it up however it comes apart. Then cut it with a simple pair of scissors from the wires. Just cut it off. I know it seems wrong but that's all you need to do.
Now strip the plastic ends of the two wires so that the metal in the wires are exposed. If you don't have a wire stripper you can use scissors. Just be careful not to cut the metal wires on the inside. If you do you can always cut off the mistake and try to restrip further down the cord.
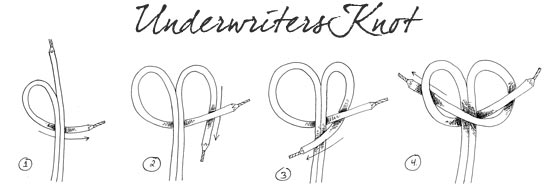
Then (although I didn't do this) you should tie an electrical knot. This helps to keep the cord from getting pulled down through the lamp over time.
Here's how you make one via FactoryDirect.com
Now take your new light socket. There should be three different colored screws. One black, one gold and one silver.
Find the neutral wire. It will have "ribbing" on the outside plastic while the hot wire will have a smooth outer plastic. Here's an example below.Wrap the neutral (ribbed) wire around the silver screw. Then wrap the hot (smooth) wire around the gold screw. Tighten with a screwdriver. Important! If you are only dealing with two wires (like in this tutorial), do not use the black screw.
Pull the cord down through the lamp through the base so that there is no excess wire and that the socket is tight against the base. Add the cardboard cover and switch over the socket.
Add the cover.
How you're ready to add your bulb and shade!


 Like not spending money?
0 {comments}:
Post a Comment